-
The
wheel and nylon gear need to be fixed together. This can be achieved
through several ways but for strength and ease of disassembly, (in case
it needs to be replaced) we recommend bolting it to the wheel.
-
To
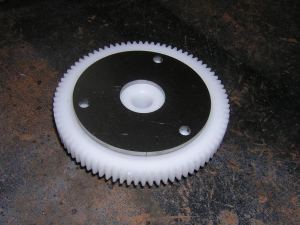
avoid distortion when bolting the gear to the wheel, we provide a
spacer piece. The spacer also acts as a template for drilling three 5mm
holes through the gear. You may need to slightly file the the leading
edge of the centre hole but it should fit pretty snuggly in to the
recess of the gear for drilling.
|
 |
|
-
4
of the 4" wheels should be supplied with centering points for the gear
bolts.
-
Drill
3 no. holes on 4 of the wheels to take a 5mm tap (4.2mm). Drill
straight through the wheel. If you are confident at tapping threads
then you may not want to drill straight through the wheel but for most
of us it is easier to tap a thread in an open hole. The hole in the
outer face of the wheel can be filled later before painting.
-
Using
a 5mm tap bit thread the three holes in the wheel.
|

|
 |
Left-
mould mark on the Delrin wheel. This face goes towards the
wheel/spacer. Use a chisel or knife to remove the raised mark. Put
the gear in a vice and cut the collar off using a large hacksaw,
so it is flush with the face of the gears.
|
-
Press
the spacer piece on to the gear, making sure it fits flush against the
gear and the holes line up. File if necessary. Now loosely bolt the
gear to the wheel. Do not tighten the bolts until the axle has been
inserted. This will help make sure the Delrin gear is central on the
wheel.
-
Degrease
the centre of the wheel and one end of an axle. Smear both the wheel
centre and axle shoulder with Loctite 603 and press together. At this
point check to make sure the axle is pushed home. Back to back of
wheels should be 119mm.
-
Once
you are sure the axle is correct, tighten up the bolts on the gear. Do
up fairly tight to avoid them coming loose. If in doubt apply bearing
fit to the bolts - which can be applied from the face side of the wheel.
  
|