RIDE ON RAILWAYS
esales@rideonrailways.co.uk
Made in Britain
Tel 01708 374468

Motor Assembly


For 2010 model onwards

Due to the lack of supply of Fasco motors we have opted for standard supply of DC motors from the automotive industry

Motor Basics

Right - the inside of one of our motors - clearly shown is one of the two sealed ball race bearings + the brush gear which is located at the rear of the motor.

These motors are used in the automotive industry which is a much larger market than 5" gauge engine manufacturers. As such there should never be a supply issue as we have seen on many previous occassions.

Preparing the Motor

Due to the close proximity of the motor to the axle you will need to slightly modify the motors mounting ring.

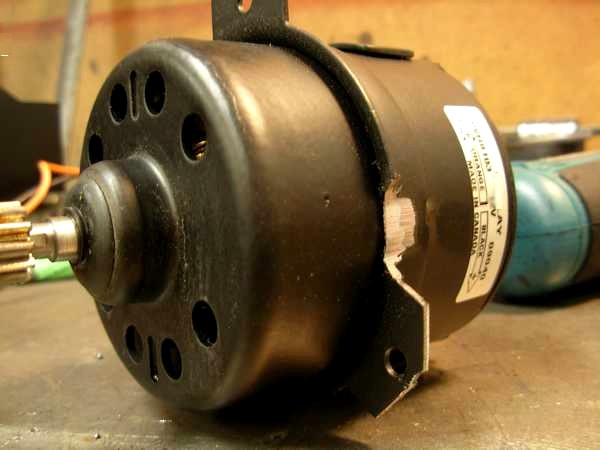
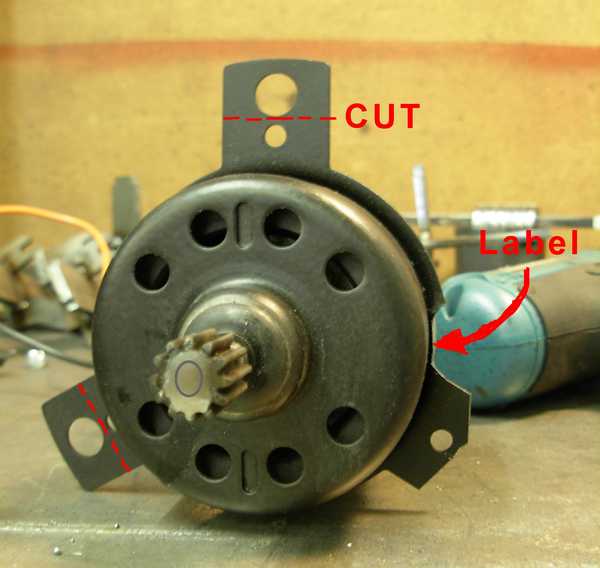
Grind or file a groove as per the picture on the left. What you need to do is remove the raised lip of the exisitng mounting ring to allow the axle to pass.

The cut in the picture was made with a grinding disk and has just caught a bit too much.

Cut the three motor mount tags down using a saw or tin snips to leave only the 5mm hole.
Before fitting the motor in to the mount you will need to fit the oilite bearings to the mount. To do this we recommend using Loctite 603 bearing fit. This is oil tollerant and stands a better chance of fixing the beaings.
  • Using a round file clean out the inner faces of the beairng holes. Mainly do this to remove the slag from the laser cutting process rather than removing metal.
  • Degrease the outside of the oilite bearings and the outer face of the mount using a solvent and a clean rag.
  • Apply bearing fit to the outer face of the oilite bearing and insert the first bearing.
  • Before the Loctite sets, slide an axle through the fitted bearing and through the hole for the second. Use the axle to centre the bearing.
  • If you cannot ge the axle through the second hole remove the oilite bearing and ease the hole.
  • Now insert the second bearing by sliding it along the the axle. This method helps align the bearings in the mount. If you are having problems getting the bearing to fit, open the mounting hole up slightly with a file.
  • Remove the axle and allow the bearing fit to set.
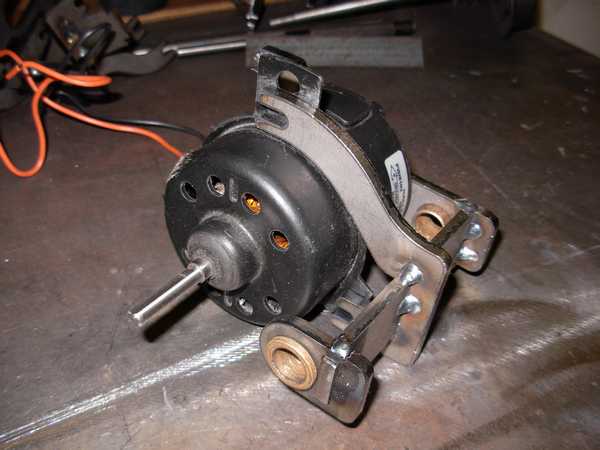
The motor mounts shown differ as they are now supplied with a drop piece at the gear end which offers protection of the nylon gear.

Do not mount the motor at this stage.

We now supply the motors with the metal gear pre fitted. Should you wish to mount your own please note the following -
  • The gear should be 1.5mm off of the shoulder before cutting the spindle down.(width of a 6mm washer)
  • Clean spindle with clean solvent and burr the spidle with a hacksaw to help adhesion of the bearing fit
  • Clean spur gear with solvent and scratch up inner surface.
  • Do not let bearing fit run down the spindle and go towards the motor.

We can supply the gear un bored with shoulder which could be machined to provide grub or pin fixing.


Hercules owners  


Copyright Ride on Railways Ltd 2019